Тет-ем-ауа
 Раса: нага - чтобы загрузить индивидуальное изображение, нажмите здесь |
| EverQuest II информация об именном мобе | |
|---|---|
| Зона (Обновление) | Гробница безумного крестоносца (The Shadow Odyssey) |
| Раса | Нага |
| Уровень | 85▲▲▲ Тир 9 Эпический х4 |
| Местонахождение | Бассейн Наги |
| Трофеи | Дополнительная база: LootDB |
| Атаки ближнего боя | колющее |
| Специальные атаки |
|
| АД | Да |
| Очки статуса | 16000 |
необходимо закончить перевод данной статьи
Стратегия
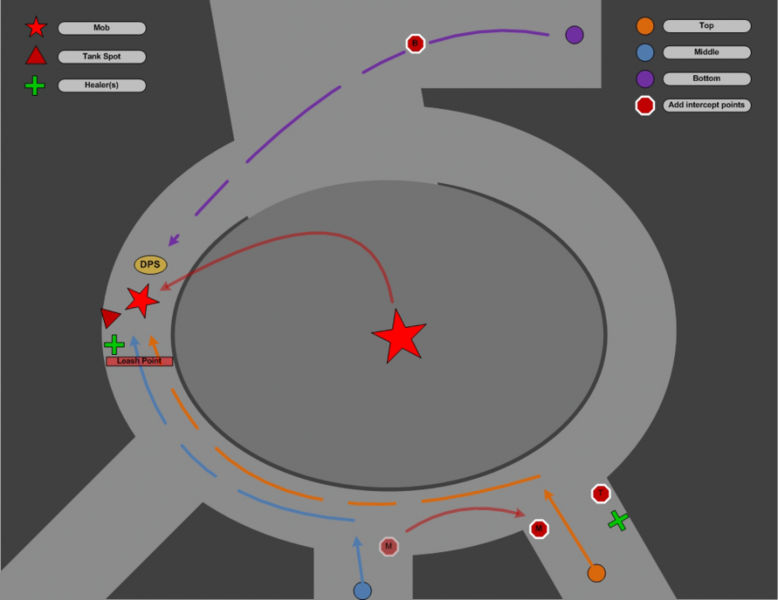
The pull begins with the entire raid stacked up in the spot just behind the main tank as seen in the diagram below. When the MT begins the pull the raid must be stacked up to help mitigate the initial AE with blade dance or tortoise shell. Mt will hold the mob in the location shown in the diagram. DPS should set up opposite the tank just at the parameter of Thet's targeting ring with healers on the opposite side. Dps heals and cures until about 45 seconds into the fight at which time Thet will mark four members of the raid with "Mark of the Serpent" shown above. This is when those four raiders will execute the special team strategy detailed below to take out the adds (a thet disciple). Once the individual adds are dead each raider should move back to the DPS/Healer location designated in the diagram. This is pretty much Rinse and repeat through the entire fight.
Heal Strategy
Pretty basic healing tactics on this one; heal your group as normal. Curing is where it gets critical. There are three effects although, "Pungent Mist" is the only one that should be cured and one curse do not remove this (Curse of Thet.) There should be one designated healer that helps up top to help heal raiders fighting the adds, as shown in the diagram by the green cross.
Tank Strategy
This is straight tank in place and hold aggro. The location chosen in the diagram was selected for a myriad of reasons. It is central to the encounter so it is both the shortest distance for raiders to run to pick up the adds, as well as the furthest distance for the adds to traverse to get to the named. Engaging the mob at this location also decreased the potential damage done to the raid force by the initial AE double tap. The trickery is pretty standard if the Main tank gets marked off tank must be prepared to pick it up fast.
DPS Strategy
DPS on Thet must make sure to maintain the proper distance from the mob to help minimize the effects of "Pungent Mist" You must remain mindful of you own curing via potions should your healer be called out to fight adds. Additionally when the designated players move out to intercept the adds coming from the middle location they must remember to drag it to the top location to fight it so that the add healer can cast on them.
Special Team Strategy
This is the make or break part of the strategy. Add control is the key to winning this fight. Every 45 seconds 4 members of the raid will be marked with the effect "Mark of the Serpent" shown above, about 10 seconds later 3 mobs will spawn (a thet disciple). The marked players are the only four members of the raid force that can stop and engage the adds. When a member of the raid is marked they must run to one of the spots top, middle, or bottom as designated in the diagram by the Orange, Blue, and Purple dots. The mob must be stopped and killed in less than 35 seconds after they spawn. How to determine who goes to what spot is up to the raid leaders discretion, a good rule of thumb is to send your highest DPS raider to the bottom and the rest up top. Add Mitigation Strategies
Every member of the raid will make a macro that sends the raid leader a tell and shouts to the zone that they are marked. The raid leader will route the four players as he sees fit to one of the three locations. A general rule of thumb to follow is all healers and support classes to the top so they can fight as a team and your high DPS players to the bottom. The reason for the tell macro is so that the raid leader can make a snap judgment if you get an unfavorable marked situation.
Conclusion
This is a semi technical fight only because of the targeted add control. I recommend that you send out your raiders to find a heroic 82 single up mob to practice killing in under 35 seconds. Once your force can do this or at the very least keep the adds busy till the following wave you have got this fight in the bag. There is one nox to cure which can be self cured with potions. The rest is just DPS on Thet, good luck.
Источник: EQ2i.
- Именные мобы
- Гробница безумного крестоносца - именные мобы
- The Shadow Odyssey - именные мобы
- Нага
- Тир 9 - именные мобы
- Тир 9 - эпические х4 именные мобы
- Эпические - именные мобы
- Эпические х4 - именные мобы
- Статьи о именных мобах - не указаны координаты
- Статьи о именных мобах - не указан EQ2MAP uid
- Мобы, убийство которых вознаграждается ОД
- Мобы, убийство которых вознаграждается ОС
- Необходим перевод

