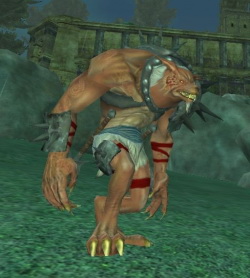
Лаполом
 Раса: Дролварг - чтобы загрузить индивидуальное изображение, нажмите здесь |
| EverQuest II информация об именном мобе | |
|---|---|
| Зона (Обновление) | Тронный Зал Наказания (Rise of Kunark) |
| Раса | Дролварг |
| Уровень | 82 Тир 9 Эпический х4 |
| Местонахождение | В центре второй комнаты |
| Трофеи | -- трофеи - части эпических комплектов брони --
-- трофеи, не относящиеся к комплектам брони --
-- трофеи, необходимые для дальнейшего рейд-прогресса -- Дополнительная база: LootDB |
| Связанные задания | |
| АД | Да |
| Очки статуса | Мин. 16000 ОС |
Умения
- Stuck -- Ability used to break lock
- Whirling Attack (20s) - trauma AE (causes Intimidation-- Silence for 1 minute - cureable stifle/stun.)
- Great Cleave (20s, swipe doesn't affect) - Incurable frontal AE when he lifts his shoulders to do a "big swing" Knockback and Stun approximately 10 seconds.
- Battlerage - When Pawbuster kills a person he gains 2% health as gets a Battlelust added to his buff bar. Battlelust makes him hit harder and take a % less damage per hit.
Стратегия
Many groups have strategies for fighting this mob. The strategies below have all been proven to work with various group makeups in the raids.
Strategy One: Start the Fight Over the Grate
This is a SURVIVAL fight. Pawbuster will kill himself.
Position Pawbuster over the grate in the middle of the floor (notice the fan underneath). Make sure he's positioned so his axe hits the towards east side of the grate. After a few (number yet determined) times of him hitting the lock on the grate he will bust the lock and the person on the lever should hit it then.
Pawbuster has a trauma AE that stifles for 1 minute. This MUST be removed from Main Tank priests. Make sure the MT priests are max heal range from the Tank, who should be positioning PB over the Grate. Pawbuster will also stun the tank which is an agro-reducer. Have your OT healers/priests at max cure range of the MT priests, so your MT priests can trauma cure and heal the MT.
Have someone use the lever when Pawbuster is at 20% and he will fall into the fan and die. Need to get his health to 25% for him to have the strength to break the lock.
Strategy Two: Start the Fight in the Corner
Another strategy is to fight him in a corner in upper room first till his health is at ~20%, then stop all dps and move him down to the grate. When he is there, it's just important to keep him there. DPS players should hold back to avoid risking an aggro loss. Wait till Pawbuster bursts the lock, then pull the lever.
Positioning is important. Keep all DPS in front of the healers, with one healer behind all others assigned to just cure other healers. Have a second tank that takes over aggro when the first tank gets stunned, and swap back on next stun. (Only have one of them in front of Pawbuster at a time, with the other in his back to avoid getting both stunned at same time.)
Cure, Cure & Cure - it's annoying as a healer, but only constant curing of can keep DPS up in this fight. The right priorities on who to cure are important. Start cures with critical players: MT, 2nd Tank, Healers, Highest DPS, and so forth.
Scouts are very important in this fight. They can do a lot more DPS than mages with the constant stifles. Try to optimise the group setup to get as much buffs as possible on the scouts. The DPS will be better and fight easier.
Additional Information=
For this Raid encounter you must use the scripted fight and drop him into the fan below the grate, any attempt to DPS him to death will result in continous heals when he hits around 1-2% HP, and he heals to approx. 10% or so. Other key factors in making this an easy kill are:
1- Having anyone needing cures back away from the mob and get cured, so that healers don't need to enter the stifle/stun range, and it identifies more easily those that still need cures.
2- Stack 2 healers (druids work well) behind the MT healers and any other group healers you have in the raid. These healers primarily cure the stun/stifles off MT and other group healers. Back up heals need to be at max range from frontline healers for this to be effective and prevent them from getting zapped by stuns.
- Страницы, использующие повторяющиеся аргументы в вызовах шаблонов
- Именные мобы
- Именные мобы для заданий
- Тронный Зал Наказания - именные мобы
- Rise of Kunark - именные мобы
- Дролварг
- Тир 9 - именные мобы
- Тир 9 - эпические х4 именные мобы
- Эпические - именные мобы
- Эпические х4 - именные мобы
- Мобы, убийство которых вознаграждается ОД
- Мобы, убийство которых вознаграждается ОС
- Необходим перевод
